Author: Karrah Lou

  • How Long Does a Pole Barn Last – Here’s What to Expect

    How Long Does a Pole Barn Last – Here’s What to Expect

    Pole barns are popular for their cost-effectiveness, durability, and versatility. Whether used for storage, a workshop, or livestock, a pole barn is a great investment. 

    In this article, we’ll explore the typical lifespan of a pole barn, factors that affect longevity, and steps you can take to ensure it lasts as long as possible.

    How long does a pole barn last?

    A well-built pole barn can last 30-50 years or longer with proper maintenance. Regular inspections, good drainage, and protective coatings on the wood can help extend its lifespan.

    Key Takeaways

    • A well-built pole barn can last anywhere from 30 to 50 years, with some lasting even longer if properly maintained.
    • The quality of materials, the environment, and regular maintenance all play a crucial role in determining how long a pole barn lasts.
    • Proper care and timely repairs can significantly extend the lifespan of a pole barn, allowing it to serve its purpose for decades.

    What Is a Pole Barn?

    What-is-a-Pole-Barn

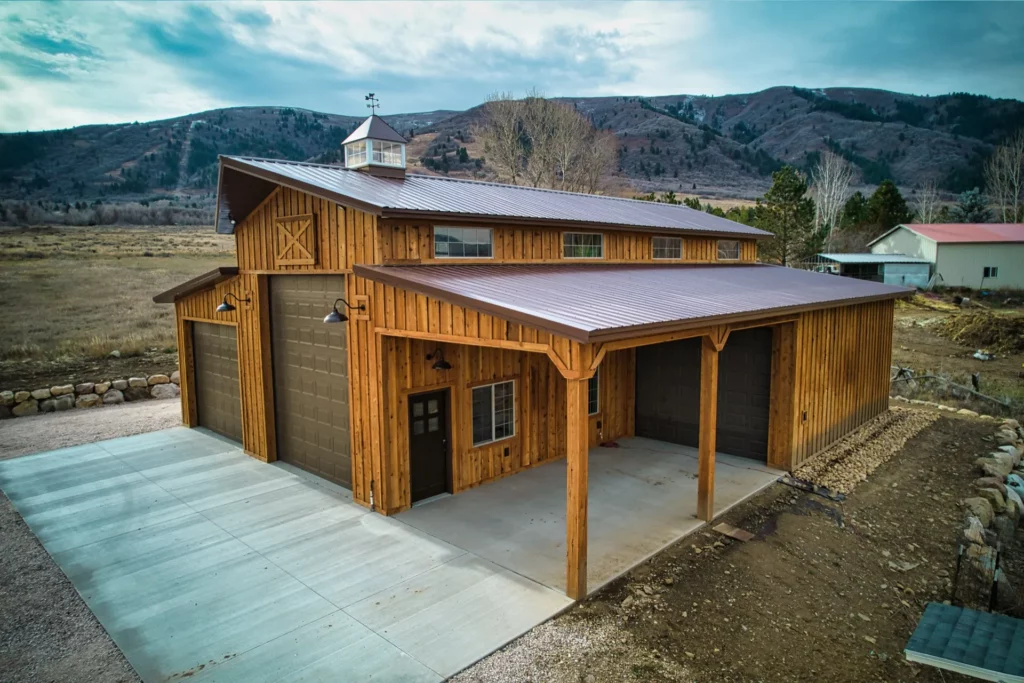
    A pole barn, also known as a post-frame building, is a type of structure that uses large wooden posts or poles as the main support system. 

    These posts are placed directly into the ground or set in concrete, and horizontal beams are then attached to the posts to create the frame of the building. 

    The exterior of the barn can be covered with various materials such as metal or wood.

    Pole barns are used for a wide range of purposes, from agricultural storage to residential or commercial applications. 

    Their simple design, ease of construction, and lower cost compared to traditional buildings make them a popular choice for many.

    How Long Do Pole Barns Typically Last?

    The lifespan of a pole barn depends on several factors, but in general, a well-constructed pole barn can last between 30 and 50 years. 

    However, with proper maintenance and attention, it’s possible for a pole barn to last much longer. 

    Some of the oldest pole barns still in use today have been around for 60 years or more, proving that with the right care, these buildings can stand the test of time.

    How to Extend the Life of Your Pole Barn

    If you want to ensure your pole barn lasts as long as possible, there are a few steps you can take to maintain and protect the structure. 

    Below are some important maintenance tasks to keep your pole barn in top condition:

    Regular Inspections

    Perform regular inspections of the barn to spot early signs of damage. Along with checking for cracks in the foundation, rot or mildew on the posts, and rust on metal surfaces, consider whether repainting or painting a pole barn could help protect it from future wear.

    Identifying and addressing problems early can prevent costly repairs down the line.

    Protect Against Moisture

    Moisture is one of the leading causes of deterioration in pole barns, particularly in areas with high humidity or frequent rainfall. 

    Make sure your barn has proper drainage around it to prevent water from pooling near the foundation. 

    Additionally, treat the wooden posts with preservatives to protect them from rot and pests.

    Tip: Consider installing a moisture barrier under the floor if you are using the barn for storage, as this will help keep the interior dry and prevent the buildup of mould or mildew.

    Maintain the Roof

    The roof is one of the most important parts of a pole barn. Regularly check for leaks, damaged shingles, or rust on metal roofing. 

    If you spot any issues, address them immediately to avoid further damage. In areas with heavy snow, remove snow buildup to prevent strain on the roof.

    Tip: Clean your roof regularly to remove debris, such as leaves or branches, that could cause water to pool on the surface.

    Repaint or Reseal the Exterior

    Wooden barns often need periodic painting or resealing to shield the wood from harsh weather. Metal barns, on the other hand, should be inspected for rust and treated with inhibitors when needed. For long-term durability, you can see more on pole barn post longevity to understand how proper upkeep extends the life of your structure.

    Repainting or resealing your barn every few years can help maintain its appearance and protect it from wear.

    Upgrade Insulation

    If your pole barn is being used as a workshop or living space, upgrading the insulation is a smart move. Proper insulation not only improves comfort but can also help extend the overall pole barn post lifespan by reducing exposure to moisture and temperature extremes.

    Proper insulation can help control temperature and reduce wear on the structure caused by temperature fluctuations. 

    It can also help improve energy efficiency if you plan to heat or cool the space.

    How to Tell if Your Pole Barn Needs Repair

    FinishRoof Inside

    Over time, wear and tear will take a toll on any structure. It’s important to know the signs that your pole barn needs repair so you can take action before issues become more serious. Look out for:

    Sagging or bowing: If the walls or roof of your pole barn begin to sag or bow, it’s a sign that the structural integrity may be compromised.

    Water damage: Excessive moisture, leaks, or mould are signs that water is getting into the barn and causing damage to the structure.

    Pest infestations: Termites or other pests can damage the wood and weaken the structure, so it’s important to check for signs of infestation.

    Rot or mildew: Wood that is soft or smells musty is likely rotting. If you notice these signs, the affected wood should be replaced immediately to avoid further damage. To prevent future issues, it’s important to know how to keep pole barn posts from rotting, such as using pressure-treated lumber, setting posts in gravel instead of concrete, and applying waterproof sealants to protect against moisture.

    Frequently Asked Questions 

    1. How long will a pole barn last?

    A well-maintained pole barn can last anywhere from 30 to 50 years, with some lasting even longer if the right materials are used and regular maintenance is performed.

    2. Can a pole barn last longer than 50 years?

    Yes, with proper care and upkeep, a pole barn can last beyond 50 years. High-quality materials and consistent maintenance are key factors in extending its lifespan.

    3. How do I maintain my pole barn to ensure it lasts?

    Regularly inspect the barn for damage, keep the roof clean and maintained, prevent moisture buildup, and treat the wood to protect it from rot and pests. To extend its lifespan, it’s also important to proper insulate a metal pole barn, ensuring effective sealing and energy efficiency.

    Conclusion

    A pole barn can be a long-lasting and cost-effective solution for many homeowners, but its lifespan depends on factors such as the quality of materials, climate, and maintenance. 

    By taking proper care of your pole barn, including regular inspections and maintenance, you can ensure that it serves you well for decades. 

    Whether you’re using it as a storage space, workshop, or living area, a pole barn can be a valuable investment with the right care and attention.

  • Can You Legally Live in a Pole Barn – Find Out Today

    Can You Legally Live in a Pole Barn – Find Out Today

    As more people seek alternative housing options, pole barns have become increasingly popular for their affordability and versatility. 

    However, many homeowners wonder if it’s legal to live in a pole barn, and the answer depends on several factors, including local building codes, zoning laws, and regulations. 

    In this article, we’ll explore the legalities of living in a pole barn, key considerations before converting one, and how to ensure your project complies with the law.

    Can you legally live in a pole barn?

    Yes, you can live in a pole barn, but you’ll need to ensure it’s properly insulated, meets building codes, and has all necessary utilities and permits. One common question is, Is a permit required for a pole barn? The answer depends on your location, so be sure to check local zoning laws and building regulations for specific requirements.

    Key Takeaways

    • Living in a pole barn is legally possible, but it depends on local zoning laws and building codes.
    • Before converting a pole barn into a residence, you must ensure it meets building standards for habitability.
    • The process can be complex, requiring permits, inspections, and potentially extensive modifications to meet residential requirements.

    What Is a Pole Barn?

    classic red barn farmland

    Before diving into the legalities of living in a pole barn, it’s important to understand what a pole barn is

    A pole barn is a type of building typically made from wood, metal, or a combination of both. 

    It’s supported by large poles (posts) buried in the ground, hence the name “pole barn.” Pole barns are often used for agricultural purposes, such as housing equipment, livestock, or storage. 

    However, their open structure and large interior space make them suitable for a variety of other uses, including workshops, garages, and even homes.

    Can You Convert a Pole Barn Into a Home?

    In many cases, converting a pole barn into a home is possible. 

    However, it’s essential to follow the proper steps to ensure the conversion meets residential standards and complies with local regulations. 

    Here are a few things to consider when contemplating a pole barn conversion.

    Zoning Laws and Land Use Regulations

    One of the first things you’ll need to check is your local zoning laws. 

    Zoning laws dictate how land can be used, and different areas have different rules for residential, commercial, and agricultural zones. 

    Some areas may allow for a pole barn to be converted into a living space, while others may restrict this use to agricultural or non-residential purposes.

    Action: Contact your local zoning department to find out whether the land where your pole barn is located can be used for residential purposes. 

    If your property is in an agricultural zone, you may need to apply for a zoning change or variance to allow for residential use.

    Building Codes and Permits

    Building codes are set by local governments to ensure structures are safe and habitable. If you want to live in a pole barn, it must comply with these codes. 

    Many people wonder, can you live in a pole barn? The truth is, most pole barns aren’t originally built to residential standards, which means major updates are often needed to bring them up to code.

    Action: Before starting any work, apply for the necessary permits. These permits may include electrical, plumbing, and structural approvals, depending on the extent of the conversion. 

    Make sure to hire professionals (such as architects, contractors, and engineers) to ensure that the building meets the required standards for electrical wiring, plumbing, insulation, fire safety, and structural integrity.

    What Modifications Are Needed to Live in a Pole Barn?

    To convert a pole barn into a livable space, several modifications will likely be required. These modifications ensure that the structure is safe, comfortable, and up to code.

    Insulation and Weatherproofing

    Most pole barns are not designed with insulation, so you’ll need to add insulation to keep the interior comfortable. 

    Insulating the walls, ceiling, and floor will help regulate temperature, reduce energy costs, and prevent moisture buildup. If you’re wondering how to insulate a pole barn ceiling, consider using spray foam insulation, fiberglass batt, or reflective insulation. These options can effectively keep the space comfortable year-round by preventing heat loss in the winter and keeping it cooler in the summer.

    Additionally, proper weatherproofing is necessary to prevent leaks and ensure the building is protected from the elements.

    Action: Install high-quality insulation and consider adding a vapor barrier to prevent moisture damage. 

    You may also need to replace or add windows and doors that are designed for residential use, ensuring they are energy-efficient and secure. For help with this process, refer to a trusted metal pole barn window installation guide to ensure proper fit and function.

    Plumbing and Electrical Systems

    Pole barns typically do not come with plumbing or electrical systems installed. 

    Depending on the intended use, you may need to install plumbing for a bathroom, kitchen, and laundry area, as well as electrical wiring for lighting, outlets, and appliances. 

    In many cases, you’ll need to upgrade the electrical system to meet the demands of a residential home.

    Action: Hire licensed plumbers and electricians to ensure the installation of these systems complies with local codes and safety standards. 

    You’ll also need to install water heaters, sewer connections, and possibly a septic system if your property is not connected to municipal water.

    Interior Finishing

    Pole Barns 1

    To make the pole barn suitable for living, you’ll need to finish the interior. 

    This includes drywalling, painting, installing flooring, and adding interior fixtures such as cabinets, countertops, and lighting. 

    You may also want to add insulation to improve comfort and energy efficiency.

    Action: Plan the layout of the interior to ensure that it’s functional and comfortable. 

    You may want to create separate rooms for living spaces, such as bedrooms, a kitchen, a bathroom, and a living room. 

    Professional interior designers or contractors can help with space planning.

    Ventilation and HVAC Systems

    Proper ventilation is essential for ensuring good air quality and moisture control in your pole barn. 

    Depending on your local climate, you might need a heating, ventilation, and air conditioning (HVAC) system to maintain comfort year-round. If you’re considering this lifestyle, make sure to get the facts on living in a pole barn so you understand how systems like HVAC play a role in daily comfort.

    Action: Work with HVAC professionals to install the necessary ventilation and air conditioning systems. 

    Ensure that your pole barn is adequately ventilated to avoid issues with humidity and stale air.

    Frequently Asked Questions 

    1. Can I live in a pole barn full-time?

    Yes, you can live in a pole barn full-time, but it must meet residential building codes, zoning laws, and safety standards. You will likely need to make significant modifications to the structure to make it habitable.

    2. What are the benefits of living in a pole barn?

    Living in a pole barn offers affordability, flexibility, and the ability to design a custom space. Pole barns also provide plenty of open space, making them ideal for people who want a more expansive living area.

    3. Is it expensive to convert a pole barn into a home?

    The cost of converting a pole barn into a home varies greatly depending on the size of the barn, the materials used, and the extent of the modifications required. Expect to pay anywhere from $20,000 to $100,000 or more for the conversion.

    Conclusion

    Living in a pole barn is an increasingly popular option for people looking for an affordable and unique living space. 

    While it is legally possible to convert a pole barn into a home, it’s important to consider zoning laws, building codes, and the necessary modifications before starting the project. 

    With the right planning, permits, and professional assistance, converting a pole barn into a comfortable living space can be a rewarding and cost-effective choice.

  • What Size Post for Pole Barn – Don’t Miss This Guide

    What Size Post for Pole Barn – Don’t Miss This Guide

    Building a pole barn requires careful consideration, especially when it comes to the size of the posts. 

    These posts are the backbone of your structure, supporting the entire building and ensuring stability. 

    In this guide, we’ll explain how to determine the right size posts for your pole barn, the materials to use, and how to ensure your posts provide proper support. If you’re asking yourself, is 40×40 pole barn is right?—understanding post size and material is a great place to start.

    What size post for a pole barn?

    The size of the post for a pole barn depends on the barn’s dimensions and load requirements. Typically, 6×6 or 8×8 posts are used, but larger barns may need stronger posts for additional support.

    Key Takeaways

    • The size of the posts you choose will depend on the size of the pole barn, the intended use, and the weight the posts will support.
    • Common post sizes for residential pole barns range from 4×4 inches to 6×6 inches, with larger sizes used for commercial structures.
    • The depth and material of the posts are also essential considerations when building a stable pole barn.

    The Importance of Choosing the Right Post Size

    Pole Barns

    The posts in a pole barn are crucial for providing structural integrity. They hold up the entire frame and help resist the forces of wind, rain, snow, and even seismic activity in some areas. 

    The right size of post will ensure that your structure remChoosing the right size of post is key to keeping your structure solid and stable. It helps prevent sagging or even collapse. Along with learning how to square a pole barn, this step ensures everything stays strong and properly aligned from the start.ains solid and stable, preventing sagging or potential collapse.

    To ensure the success of your pole barn project, it’s important to understand the weight-bearing capacity of your posts and how they interact with the other structural components. 

    Choosing the correct size post can also influence the overall cost and longevity of your pole barn.

    What Are the Factors That Affect Post Size?

    The size of the posts required for your pole barn will depend on several factors. Whether you’re working with custom blueprints or standard 24×36 pole barn plans, each factor must be considered carefully to ensure your structure is both functional and safe.

    If you’re considering options like affordable metal pole barn kits, it’s essential to understand how post size impacts the overall stability, especially for specific dimensions such as a 24×32 pole barn kit. Proper planning will help you build a reliable structure that meets your needs without exceeding your budget.

    If you’re considering options like affordable metal pole barn kits, it’s essential to understand how post size impacts the overall stability, especially for specific dimensions such as a 24×32 pole barn kit. Proper planning will help you build a reliable structure that meets your needs without exceeding your budget.

    Let’s take a closer look at these factors:

    The Size of the Pole Barn

    The larger the pole barn, the larger the posts will need to be. 

    For example, a small barn that is 24×24 feet may only require 4×6 posts, while a larger structure, such as a 40×60-foot barn, will likely require 6×6 posts.

    A mid-sized option like a 24×40 pole barn typically falls somewhere in between, often requiring careful planning to determine the appropriate post size based on design and load needs.

    Larger barns, such as those with a 60×80 pole barn size, require more support due to the increased weight of the building materials and potential loads.

    Small Barns (Under 30×30 feet): Typically, 4×6 or 6×6 posts will work well for smaller structures.

    Medium Barns (30×40 to 40×60 feet): Larger posts, such as 6×6 or 8×8, may be necessary to support the increased size.

    Large Barns (Over 60 feet long): Larger posts (e.g., 8×8 or more) are often required for commercial structures, such as a 60×120 pole barn, that experience higher loads.

    Weight of the Structure

    The materials used for the construction of the pole barn will affect the size of the posts. 

    A barn with a heavy roof, like metal roofing or one packed with insulation, needs larger posts to handle the extra weight. The same applies to barns that house heavy equipment or livestock, so it’s smart to find out how far apart pole barn posts go before planning your build.

    Lightweight Structures: If your pole barn will primarily be used for storage or light farming activities, you may not need to invest in larger posts.

    Heavy Duty Structures: If the pole barn will house large machinery, storage, or be used for agricultural purposes, you will need larger posts that can handle the load. In such cases, heavy 36×48 pole barn plans are an ideal choice, offering the structural strength and space needed for demanding uses.

    Soil Conditions

    The soil conditions of your property will affect the depth and size of the posts. 

    In areas with loose or sandy soil, larger posts are needed to ensure that the pole barn remains stable and does not shift over time. 

    In more compact and dense soils, such as clay or rocky areas, smaller posts may suffice, but they still need to be installed at the correct depth. If you’re wondering how deep to bury pole barn posts, the answer often depends on soil type and post size to ensure structural stability.

    Loose Soil: Larger posts and deeper installation are necessary to prevent shifting and ensure stability.

    Dense Soil: Posts may be slightly smaller, but they still need to be strong enough to support the structure.

    Climate and Environmental Factors

    When building a structure in regions prone to heavy snow or strong winds, it’s important to factor in these environmental elements when selecting your post size—especially for a small barn that is 24×24 feet, where structural stability is key.

    The wind and snow load will put additional pressure on the structure, so it’s important to choose posts that can handle these forces.

    Windy Areas: In places with strong winds, such as coastal regions or open plains, larger posts may be necessary for better wind resistance.

    Snowy Regions: In areas with heavy snowfall, stronger posts will be needed to support the additional weight of the snow accumulation.

    Recommended Post Sizes for Different Types of Pole Barns

    What is a Pole Barn 1

    Now that we’ve covered the key factors that affect post size, let’s dive into some general recommendations for different types of pole barns.

    Residential Pole Barns

    For a residential pole barn, such as a shed or garage, the size of the posts can typically range from 4×4 to 6×6 inches, depending on the barn’s size and the materials used. If you’re planning a project like this, following a detailed Pole Barn Garage Construction Guide can help ensure you choose the right post size, spacing, and materials to create a durable and long-lasting structure.

    For smaller buildings, a 4×4 post can provide sufficient support, but for larger buildings or those in areas with higher snow or wind loads, 6×6 posts may be necessary.

    Post Size for Smaller Residential Barns: 4×4 or 6×6 posts.

    Post Size for Larger Residential Barns: 6×6 or 8×8 posts.

    Commercial and Agricultural Pole Barns

    Commercial or agricultural pole barns require larger posts due to their increased size and the need to support heavier equipment, livestock, or large storage areas. When deciding what size post for pole barn to use, it’s important to consider the barn’s dimensions and intended use. For smaller residential barns, 4×4 or 6×6 posts may suffice, while larger commercial or agricultural barns may require 8×8 or larger posts for added support.

    For these structures, 6×6 posts are a minimum, but 8×8 or even larger posts may be necessary for very large buildings.

    Post Size for Medium Agricultural Barns: 6×6 or 8×8 posts.

    Post Size for Large Agricultural or Commercial Barns: 8×8 or larger posts.

    Pole Barns in Areas with Harsh Weather

    In areas that experience extreme weather conditions, such as heavy snow or high winds, it’s important to choose larger posts to provide extra stability. 

    In these regions, 8×8 or even 10×10 posts might be required for larger barns.

    Post Size for Harsh Weather Areas: 8×8 or 10×10 posts.

    How to Choose the Right Post Material

    The material of the posts you choose will also impact their strength, durability, and cost. Below are some common materials used for pole barn posts:

    Wooden Posts

    Wood is a traditional material for pole barn posts and is often used for residential and small commercial buildings. 

    Wooden posts are a budget-friendly and versatile option, commonly chosen for their ease of use and variety of sizes. However, in moisture-prone environments, they can be vulnerable to rot and decay. See why our 40×60 pole barn kit is a top choice for those seeking durability and performance beyond standard wood posts.

    However, they can be susceptible to rot and decay, especially in areas with high moisture. To protect your structure, it’s essential to follow tips to keep pole barn posts from rotting, such as using pressure-treated wood, ensuring proper drainage around the posts, and applying protective coatings to minimize moisture exposure.

    Best for: Smaller residential barns or sheds.

    Steel Posts

    Steel posts are durable, strong, and resistant to rot, making them a great choice for pole barns in areas with high moisture or pests. 

    Steel posts can be more expensive upfront, but their longevity often makes them a better investment in the long run.

    Best for: Agricultural and commercial barns or buildings in damp conditions.

    Concrete Posts

    Concrete posts are incredibly strong and durable, making them ideal for heavy-duty pole barns. 

    They are resistant to rot and can withstand extreme weather conditions. However, they can be difficult to install and are more expensive than wooden or steel posts.

    Best for: Large commercial barns and barns in areas with extreme weather.

    When to Call a Professional for Pole Barn Construction

    Lean to shed

    While you can handle some aspects of building a pole barn yourself, such as clearing the area and preparing the site, it’s often best to consult with a professional when it comes to post installation. 

    Professionals have the experience and equipment necessary to ensure the posts are properly set in the ground, level, and aligned for maximum stability.

    If you’re unsure about which post size to choose or if you’re dealing with difficult soil or environmental conditions, it’s always a good idea to get advice from an expert—especially when planning a large structure like a 40×80 pole barn—to avoid costly mistakes.

    Frequently Asked Questions 

    1. How deep should the posts be for a pole barn?

    The depth of the posts depends on the type of soil and the size of the barn, but they should generally be installed 3 to 4 feet deep for adequate stability.

    2. Can I use pressure-treated wood for pole barn posts?

    Yes, pressure-treated wood is commonly used for pole barn posts as it helps protect against rot and insect damage.

    3. How do I know if I need larger posts for my pole barn?

    If your barn is large, located in an area with extreme weather, or will house heavy equipment, larger posts (such as 6×6 or 8×8) may be necessary for proper support.

    Conclusion

    Choosing the right post size for your pole barn is essential for ensuring the stability and durability of the structure. 

    By weighing factors like barn size, soil, and local climate, you’ll know exactly what your project requires. If you’re unsure, researching how many support posts for 30×40 pole barn designs can help guide your decision.

    Whether you opt for wooden, steel, or concrete posts, always make sure they are installed properly to ensure a safe and functional pole barn.

  • How to Frame a Pole Barn – Don’t Miss These Tips

    How to Frame a Pole Barn – Don’t Miss These Tips

    Building a pole barn is a practical and cost-effective way to add extra storage, a workshop, or a barn to your property. 

    One of the most crucial aspects is framing, which ensures the structure’s strength and stability. 

    In this guide, we’ll walk you through the framing process, from preparing the site to completing the framework.

    How to frame a pole barn?

    Framing a pole barn involves setting the posts, installing girts (horizontal supports), and adding the roof and wall frames. Use strong, durable materials to ensure your barn stands up to the elements.

    Key Takeaways

    • Framing a pole barn involves setting up the posts, beams, and trusses to create a strong and secure structure.
    • Proper site preparation and planning are essential to ensure a level and stable base for your pole barn.
    • If you’re not familiar with framing or construction, it’s a good idea to consult with a professional to ensure a safe and sturdy build.

    What is a Pole Barn?

    what is pole barn

    Before we dive into the framing process, it’s important to understand what a pole barn is

    A pole barn, also known as a post-frame building, is a type of structure where vertical posts are embedded into the ground to support horizontal beams, which in turn support the roof. 

    Building a pole barn can be a practical and cost-effective way to add extra storage space, a workshop, or even a barn on your property. Many homeowners and builders choose metal pole barn kits for their durability, ease of installation, and long-term value.

    One of the most important aspects of constructing a pole barn is the framing, which provides the structure’s strength and stability. 

    We’ll walk you through the process of framing a pole barn, from preparing the site to finishing the framework.

    Pole barns are commonly used for agricultural, commercial, and residential purposes due to their affordability and versatility.

    Why Choose a Pole Barn?

    There are several reasons why people choose to build pole barns:

    Cost-Effective: Pole barns are generally cheaper to build compared to traditional framed buildings due to their simple design and fewer materials required.

    Versatility: These structures can be used for a wide range of purposes, including storage, workshops, garages, and agricultural buildings.

    Durability: When properly framed and built, pole barns are sturdy and can withstand harsh weather conditions.

    Step-by-Step Guide to Framing a Pole Barn

    Framing a pole barn requires careful planning and attention to detail. Below, we’ll break down the steps involved in framing a pole barn.

    Prepare the Site

    The first step in framing a pole barn is preparing the site. This involves clearing the area of any debris, weeds, or rocks, and ensuring that the ground is level.

    Clear the Land: Before setting up your 40×60 pole barn kit near me, clear the designated area using a shovel or tractor to remove vegetation, rocks, or any other obstructions that could interfere with construction.

    Mark the Layout: Use stakes and string to outline the perimeter of the barn. This will help ensure that the structure is built in the correct location and that the posts are placed evenly.

    Set the Poles

    The next step is to install the vertical posts that will serve as the main supports for your pole barn.

    Dig Holes for the Posts: Use a post hole digger or an auger to dig holes for the vertical posts. 

    The depth of the holes will depend on the size of the posts and the local building codes, but typically they should be around 3 to 4 feet deep—especially when constructing a 36×48 metal pole barn, where stability is crucial due to the structure’s dimensions.

    Place the Posts: Once the holes are dug, place the posts into the holes and use a level to ensure that they are standing straight. 

    You may need help from another person to hold the posts in place while you check their alignment.

    Secure the Posts: Fill the holes with concrete to anchor the posts in place. Allow the concrete to cure for 24 to 48 hours before proceeding with the next steps.

    Install the Girts and Beams

    The girts and beams are the horizontal components that connect the vertical posts. These pieces provide structural support for the walls and roof of the barn.

    Install the Girts: When working on a 40x60x16 pole barn kit installation, secure the girts to the posts using nails or screws. These girts are typically spaced every 8 feet, although the exact intervals may vary depending on the overall size and design of your barn.

    Attach the Beams: Beams are placed at the top of the posts to support the roof trusses. Secure the beams to the top of the posts using bolts or heavy-duty screws.

    Install the Roof Trusses

    The roof trusses are the most important part of the frame as they will support the weight of the roof.

    Place the Trusses: The trusses should be placed evenly across the top of the beams. Space the trusses approximately 2 to 4 feet apart, depending on the size and design of the barn.

    Secure the Trusses: Use metal brackets or bolts to attach the trusses to the beams. Make sure the trusses are properly aligned and level before securing them in place.

    Install the Purlins

    Purlins are horizontal beams that run parallel to the trusses and support the roofing material.

    Attach the Purlins: Install the purlins by attaching them to the top of the trusses. They should be spaced about 4 feet apart to provide enough support for the roof panels.

    Ensure Stability: Once the purlins are installed, check that everything is secure and stable before moving on.

    Install the Roof Panels

    The final step in framing a pole barn is installing the roof panels, which shield the structure from the elements. If you’re planning a project, you can find out more about pole barn construction with metal trusses to ensure lasting strength and durability.

    Choose the Roofing Material: The most common roofing materials for pole barns are metal panels, as they are durable and cost-effective. Choose a material that suits your climate and budget.

    Install the Roof Panels: Begin installing the roof panels at the bottom edge of the roof, overlapping the panels as you go. Secure each panel with screws, making sure they are tightly fastened to the purlins.

    Ensure Proper Alignment: Check the panels regularly to ensure they are properly aligned and that there are no gaps that could let water in.

    Additional Considerations When Framing a Pole Barn

    pole barn

    While the steps outlined above will get you started, there are some additional considerations that may impact the design and construction of your pole barn.

    Building Codes and Permits

    Before starting construction, check with your local building authority to ensure that your pole barn complies with local building codes. This is especially important when considering options like cheap 40x60x16 pole barn kits, as compliance can vary based on kit specifications and regional requirements.

    In some areas, you may need a permit to build a pole barn, especially if it exceeds certain dimensions.

    Ventilation

    Proper ventilation is essential for preventing moisture buildup inside the barn. Consider installing vents near the top of the walls or at the roof peak to allow for air circulation.

    Flooring

    Many pole barns are built without floors, but if you plan to install one, consider using concrete, gravel, or wood depending on the intended use of the space.

    Insulation

    If you plan to use your pole barn as a workshop, office, or living space, you may want to consider adding insulation. 

    This can help regulate the temperature inside the barn and make it more comfortable year-round.

    When to Call a Professional

    If you’re not familiar with framing or construction, you may want to consult with a professional. 

    While some homeowners can tackle the job themselves, framing a pole barn demands precision, strength, and careful planning. Before diving in, many ask how much are DIY pole barn kits, since cost often shapes whether to DIY or hire pros.

    A professional will ensure that your pole barn is built safely and up to code, preventing potential issues in the future.

    Frequently Asked Questions 

    1. How much does it cost to frame a pole barn?

    The cost of framing a pole barn can vary widely depending on size, materials, and location. On average, framing costs can range from $10,000 to $30,000.

    2. How long does it take to frame a pole barn?

    Framing a pole barn typically takes anywhere from a few days to a couple of weeks, depending on the size of the structure and the complexity of the design.

    3. Can I frame a pole barn myself?

    If you have experience with construction and the necessary tools, it is possible to frame a pole barn yourself. However, for larger projects or if you’re unsure of the process, it’s best to hire a professional.

    This is especially true when it comes to tasks like finding the right way to cut pole barn metal panels, which requires precision and the proper equipment.

    Conclusion

    Framing a pole barn is a great way to create additional storage or workspace on your property. 

    With the right materials, tools, and preparation, you can successfully frame a sturdy and reliable pole barn. 

    Whether you choose to tackle the project yourself or hire a professional, understanding the key steps involved is essential for a successful build.

  • How to Insulate a Pole Barn Ceiling – Don’t Miss Out

    How to Insulate a Pole Barn Ceiling – Don’t Miss Out

    Insulating a pole barn ceiling is key to making the space more comfortable and energy-efficient. 

    Whether used for storage, a workshop, or a living space, proper insulation helps regulate temperature, lower energy costs, and improve overall comfort. 

    In this guide, we’ll walk you through the insulation process, including materials, steps, and key considerations.

    How to insulate a pole barn ceiling?

    To insulate a pole barn ceiling, use fiberglass or foam board insulation between the rafters. You can also add a vapor barrier to prevent moisture buildup and improve energy efficiency.

    Key Takeaways

    • Insulating the ceiling of your pole barn can help maintain a comfortable temperature year-round.
    • Proper insulation can reduce energy costs and improve the longevity of your pole barn.
    • There are several insulation materials available, each with its own benefits and application methods.

    Why Should You Insulate a Pole Barn Ceiling?

    Inside the pole Barn which is insulated with Spray Foam

    Insulating a pole barn ceiling offers several benefits, especially if Insulating a pole barn ceiling offers several benefits, especially if you plan to use the space frequently or for more than just storing tools or equipment.

    When discussing pole barns, many people wonder, why is it called a pole barn? The name comes from the original construction method, where builders used large poles or posts buried in the ground to support the roof, eliminating the need for a traditional foundation.you plan to use the space frequently or for more than just storing tools or equipment. 

    Here are some of the main reasons to consider insulation:

    Temperature Control

    Pole barns, especially those with metal roofs, can become unbearably hot in the summer and uncomfortably cold in the winter. 

    Insulating the ceiling helps to regulate the temperature inside, making the space more comfortable throughout the year. 

    Insulation reduces heat transfer, keeping the barn cooler in the summer and warmer in the winter.

    Energy Efficiency

    A well-insulated ceiling can help to lower energy bills by improving the building’s overall energy efficiency. 

    Insulation helps prevent heated or cooled air from escaping the barn, reducing the workload of your heating or cooling system. 

    This can be particularly important if the barn is used as a living or working space.

    Noise Reduction

    Insulation can also help reduce sound transmission, especially if your pole barn is used as a workshop or studio. 

    Insulating the ceiling can help minimize the noise from activities inside the barn and prevent outdoor sounds from entering.

    Condensation Control

    In areas with high humidity or extreme temperature fluctuations, condensation can form on the underside of the roof. 

    Insulation acts as a barrier, preventing condensation from accumulating and potentially causing rust or mould in the structure. However, just as important is understanding how to prevent pole barn posts from rotting, which often involves choosing pressure-treated wood, applying waterproof coatings, and ensuring proper drainage around the base of the posts.

    Materials for Insulating a Pole Barn Ceiling

    When it comes to insulating a pole barn ceiling, there are several materials you can choose from, depending on your budget, insulation needs, and the specific characteristics of your barn.

    If you’re wondering how to insulate a metal pole barn, it’s important to consider factors like climate, moisture control, and energy efficiency to select the most suitable insulation method.

    Below are some of the most common materials used for ceiling insulation:

    Fibreglass Insulation

    Fibreglass batt or roll insulation is a popular choice for insulating pole barn ceilings. It’s affordable, widely available, and provides good thermal resistance. 

    Fibreglass insulation comes in pre-measured rolls or batts that can be placed between the ceiling joists.

    Pros: Easy to install, cost-effective, and provides good thermal insulation.

    Cons: Can be itchy to handle, and proper sealing is necessary to prevent air gaps.

    Spray Foam Insulation

    Spray foam insulation is a more expensive option but offers superior thermal resistance and air sealing properties. 

    It’s applied as a liquid that expands to fill gaps and cracks in the ceiling, creating an airtight seal. This type of insulation is particularly effective in preventing heat loss and reducing energy costs.

    Pros: Excellent at sealing gaps and cracks, high R-value per inch, moisture-resistant.

    Cons: Higher upfront cost, requires professional installation.

    Reflective Foil Insulation

    Reflective foil insulation, often referred to as radiant barrier insulation, is a great choice for metal-roofed structures like a DIY 30x40x12 pole barn kit, helping to regulate temperature and improve energy efficien

    It works by reflecting radiant heat away from the building, helping to keep the space cooler in the summer. It’s often used in combination with other insulation materials.

    Pros: Effective at reducing heat gain, lightweight, and easy to install.

    Cons: Less effective in colder climates, needs to be combined with other insulation types for optimal results.

    Rigid Foam Board Insulation

    How To Insulate A Pole Building

    Rigid foam board insulation is another excellent option for insulating a pole barn ceiling. It offers good thermal resistance and is relatively easy to install.

    If you’re working on your barn ceiling project and also planning exterior updates, understanding how to cut pole barn metal properly can help you prep for tasks like trimming around insulation or adding metal ceiling panels. The foam boards are cut to fit between the ceiling joists and can be sealed with foam board adhesive.

    Pros: Good thermal performance, moisture-resistant, and easy to cut and install.

    Cons: Can be more expensive than fibreglass and requires proper sealing to prevent air leaks.

    Cellulose Insulation

    Cellulose insulation is made from recycled paper products and treated with fire retardants. It’s an eco-friendly option for those looking to reduce their environmental footprint. 

    Cellulose is usually blown into the ceiling space to form a dense, insulating layer. If you’re planning upgrades, knowing how to install a metal ceiling in a pole barn can also improve efficiency and give the space a cleaner finish.

    Pros: Environmentally friendly, good thermal resistance, and effective at soundproofing.

    Cons: Can settle over time, leading to reduced insulation performance, and may require professional installation.

    Frequently Asked Questions 

    1. How much does it cost to insulate a pole barn ceiling?

    The cost of insulating a pole barn ceiling varies depending on the size of the barn and the type of insulation used. For example, if you’re working with a 24×40 pole barn kit, you can expect to pay between $1,500 and $3,000 for materials and installation, depending on the insulation type and labor costs.

    2. Can I install insulation myself?

    Yes, you can install insulation yourself if you’re comfortable with DIY projects. However, for spray foam insulation, professional installation is recommended due to the equipment required.

    3. Does insulation improve the energy efficiency of my pole barn?

    Yes, properly insulating your pole barn ceiling can significantly improve energy efficiency by regulating the temperature inside the building and reducing heating and cooling costs.

    Conclusion

    Insulating your pole barn ceiling is an excellent way to improve energy efficiency, comfort, and the overall longevity of your structure. 

    Whether you choose fibreglass, spray foam, or another material, taking the time to insulate your ceiling properly will pay off in the long run. 

    With the right materials and installation steps, you can make your pole barn a more comfortable and functional space for whatever purpose you need.

  • How to Keep Pole Barn Posts from Rotting – Don’t Miss Out

    How to Keep Pole Barn Posts from Rotting – Don’t Miss Out

    Pole barns are a great choice for storage, workspaces, or even homes, but rotting posts can be a major issue. 

    When the wooden posts begin to rot, it can threaten the structure’s stability, leading to expensive repairs. 

    Fortunately, there are ways to prevent this. In this guide, we’ll explore techniques to protect your pole barn posts and maintain the longevity of your structure.

    How to keep pole barn posts from rotting?

    Prevent rotting by using pressure-treated posts, elevating them off the ground, and installing a good drainage system. Sealing the base and using metal post brackets can also help extend the life of the posts.

    Key Takeaways

    • Rotting posts can weaken the entire structure of a pole barn, making it essential to take preventative measures.
    • Using treated wood, proper installation techniques, and regular maintenance can significantly extend the lifespan of your pole barn posts.
    • Addressing moisture, ventilation, and soil conditions is crucial to preventing rot.

    Why Do Pole Barn Posts Rot?

    Wood Post Rot Protection
    xr:d:DAFZcsrJ01c:2,j:3018646942,t:23020218

    To understand how to prevent pole barn posts from rotting, it’s important to first understand why rotting happens in the first place. 

    The main cause of post rot is moisture. When the wooden posts are exposed to moisture over time, it creates a breeding ground for bacteria and fungi, which can degrade the wood and eventually cause it to rot. 

    Soil conditions, weather patterns, and the installation method also play a role in how prone your posts are to decay.

    Soil Moisture: High moisture levels in the soil around the posts can accelerate the rotting process. In areas with heavy rain or snow, this is a particularly serious issue.

    Poor Drainage: If the posts are installed in poorly draining soil, water can pool around the base, increasing the risk of rot.

    Lack of Ventilation: If air doesn’t circulate freely around the posts, moisture can become trapped, leading to faster rot.

    How to Protect Your Pole Barn Posts

    Now that we know why pole barn posts rot, let’s look at some methods for preventing it. With a bit of effort and attention, you can keep your posts in great condition for years to come.

    Use Pressure-Treated Wood

    Pressure-treated wood is one of the most effective ways to prevent post rot. 

    During the treatment process, the wood is infused with preservatives that make it resistant to moisture, insects, and fungi. 

    This significantly reduces the likelihood of rotting, especially at the base where the posts meet the soil. Proper pole barn post spacing also helps improve durability and structural integrity over time.

    Tip: Always use pressure-treated wood for the portion of the post that will be buried in the ground or exposed to moisture.

    Install Posts Above Ground Level

    One way to reduce the risk of rotting is to ensure that your posts don’t remain in constant contact with the soil. 

    By setting the posts slightly above ground level, you improve air circulation around them, which helps prevent moisture buildup and extends the overall durability of pole barn posts.

    This also reduces the amount of time the posts are exposed to rainwater or groundwater.

    Tip: Use post anchors or concrete piers to raise the posts off the ground, ensuring a barrier between the wood and the moist soil.

    Apply a Water-Repellent Sealant

    To keep your structure strong and protected, always apply a water-repellent sealant to the posts. Paying attention to details like spacing for pole barn posts and proper sealing helps reduce the risk of moisture damage over time.

    This will create a barrier that prevents water from being absorbed into the wood, further reducing the risk of rot. 

    Sealants come in different forms, including sprays and paints, and are easy to apply.

    Tip: Reapply the water-repellent sealant every couple of years to maintain the protective layer.

    Proper Post Installation

    When installing your pole barn posts, make sure that they are placed properly to prevent issues with moisture. 

    Digging deep enough holes for the posts and ensuring that the posts are set securely in the ground will help to minimize the risk of shifting or settling, which can lead to water pooling around the posts. Determining the correct depth for setting pole barn poles is crucial to achieving this stability and preventing future structural issues.

    Tip: If you’re installing the posts in areas with high water tables or poor drainage, consider using a concrete foundation or footing to ensure proper support and drainage.

    Ensure Proper Drainage Around the Posts

    pole barn construction

    Proper drainage is essential in preventing moisture buildup around your posts. 

    Ensure that the soil around the posts is well-draining, and consider installing gravel or stone around the base of the posts to encourage water runoff. 

    If your pole barn is located in an area prone to heavy rain or snowmelt, consider using a drainage system to direct excess water away from the structure.

    Tip: Check the ground regularly to ensure water is not pooling around the posts. If necessary, regrade the area to encourage water to flow away from the foundation.

    Frequently Asked Questions 

    1. Can I use untreated wood for pole barn posts?

    While untreated wood can be used for the posts, it’s much more susceptible to rot and decay. It’s highly recommended to use pressure-treated wood to ensure the longevity and durability of the posts.

    2. How often should I inspect my pole barn posts?

    It’s a good idea to inspect your posts every 6 months, particularly after severe weather events. Early detection of damage or wear can help prevent further problems.

    3. Can I repair a rotting post myself?

    If you notice minor damage to a post, it may be possible to repair it by replacing the affected section of the wood or treating it with a wood preservative. However, significant damage may require professional help to replace the entire post.

    Conclusion

    Protecting your pole barn posts from rot is essential for maintaining the structural integrity of your building. 

    By using treated wood, ensuring proper installation, applying water-repellent sealants, and maintaining adequate drainage, you can prevent rot and ensure your pole barn lasts for years to come

    Regular inspections and maintenance will help you spot any issues early and take corrective action before they become serious problems.

  • How to Square a Pole Barn – Don’t Start Without This

    How to Square a Pole Barn – Don’t Start Without This

    Building a pole barn is an exciting project, offering valuable storage, a workshop, or a shelter for livestock. To ensure it’s sturdy and properly aligned, squaring the structure is crucial. 

    Squaring involves ensuring all corners are at right angles, which is vital for stability and aesthetics. 

    In this guide, we’ll walk you through the steps to square a pole barn correctly.

    How to square a pole barn?

    To square a pole barn, measure diagonally from corner to corner, ensuring both measurements are the same. This ensures your structure is perfectly square, making framing much easier.

    Key Takeaways

    • Squaring a pole barn is necessary for proper structure alignment and stability.
    • The process involves measuring and adjusting to ensure all corners are at right angles.
    • Accurate squaring will help prevent future issues with the roof, doors, and overall building integrity.

    Why Is Squaring a Pole Barn Important?

    new pole balm construction

    When building any structure, including a pole barn, squaring is essential for creating a solid foundation and ensuring that the building’s walls and roof align properly. 

    If a pole barn is not square, it may lead to misaligned doors, uneven rooflines, and structural instability. This can result in costly repairs or compromises in the building’s durability.

    Building a pole barn is an exciting project that can provide you with valuable storage space, a workshop, or a shelter for livestock. 

    However, to ensure that your pole barn is sturdy and properly aligned, it’s crucial to square the structure during the construction process. At the same time, many property owners also weigh roofing options — often asking Is a Metal Roof Better Than a Shingle Roof when planning out long-term durability.

    Squaring a pole barn involves making sure that all the corners are at right angles to each other, which is essential for the overall stability and aesthetic of the building. 

    We will walk you through the steps of squaring a pole barn to ensure it’s built correctly.

    A square building also ensures that materials fit together correctly, which is important for both the construction process and the long-term functionality of the structure. Homeowners often ask, Can You Put a Metal Roof Over a Shingle Roof, since proper alignment and fit are just as crucial when upgrading roofing systems.

    By ensuring that all sides are straight and level, you also prevent potential problems with the building’s foundation settling unevenly.

    Tools You’ll Need to Square Your Pole Barn

    Before you start squaring your pole barn, it’s important to gather the necessary tools to make the job easier and more accurate. Here’s a list of the tools you’ll need:

    • Measuring tape
    • Square tool (or framing square)
    • String line
    • Level
    • Stakes or markers
    • Calculator (optional)

    These tools will allow you to measure and check angles, ensuring you get the proper square corners.

    Step 1: Set Up the Foundation

    The first step in squaring your pole barn is to ensure the foundation is level. If the foundation is uneven, it will be difficult to square the barn accurately.

    Prepare the Site: Clear the site of debris and ensure that the ground is level. Mark the four corners where the poles will be placed.

    Set Corner Stakes: Drive stakes into the ground at each corner of the planned pole barn location. These will serve as your reference points for measuring and squaring the building.

    Once the foundation is level and the corners are marked, it’s time to move on to squaring the structure.

    Step 2: Use the 3-4-5 Method to Square the Corners

    The 3-4-5 method is a time-tested technique for squaring corners. This method is based on the 

    Pythagorean theorem, which states that a right triangle’s sides will always form a ratio of 3:4:5. By using this ratio, you can ensure that your corners are at perfect right angles.

    Measure 3 Feet Along One Side: From the corner stake, measure and mark 3 feet along one side of the barn.

    Measure 4 Feet Along the Adjacent Side: From the same corner stake, measure and mark 4 feet along the other side of the barn.

    Measure the Diagonal: Finally, measure the diagonal distance between the two marks you’ve made. 

    If the diagonal comes out to exactly 5 feet, you’ll know the angle is perfectly square. If it’s off, adjust the stakes until you hit the 5-foot mark, just like you would compare measurements when weighing options such as metal roof vs shingle roof to ensure accuracy.

    Repeat this process at all four corners to ensure that every angle is squared correctly.

    Step 3: Double-Check the Squareness with a Square Tool

    new two story pole barn building for hay storage on farm

    After using the 3-4-5 method, you should double-check the squareness of your corners using a framing square. 

    This will provide an additional level of accuracy, especially when working with larger structures like pole barns.

    Place the Square Tool: Position the framing square in the corner, making sure that both arms are flush with the edges of the two sides.

    Adjust if Necessary: If the square does not fit perfectly, adjust the corner until the square tool fits snugly. This ensures that the angle is 90 degrees.

    Step 4: Use a String Line to Check the Alignment of the Walls

    Once your corners are squared, use a string line to check the alignment of the walls. 

    A string line is a simple but effective tool that allows you to ensure the walls are straight and aligned with the rest of the structure.

    Stretch the String Line: Attach a string line to the corner posts and stretch it along the side of the barn.

    Check the Alignment: The string should be perfectly straight. If there is any deviation, adjust the posts or walls until the string is tight and aligned.

    Using a string line will help ensure that the walls are not only square but also aligned with the rest of the structure.

    Step 5: Secure the Posts and Frame

    Once the corners are square and the walls are aligned, it’s time to secure the posts and frame of the pole barn

    Begin by securing the corner posts in place, ensuring they remain squared throughout the process.

    Check for Square as You Secure: As you begin securing the posts and framing, continually check the squareness with your square tool and string line. 

    This will ensure that the barn structure remains level and straight as it comes together.

    Tighten the Frame: Once the posts are secured, tighten the frame and add any additional support as needed to keep the structure stable.

    Step 6: Complete the Frame and Roof

    After the posts and walls are square and secure, you can continue with the construction of the roof and the rest of the frame. 

    Use the same squaring and alignment techniques to ensure the roof sits perfectly on top of the walls, especially when closing in a pole barn using metal trusses for added structural integrity.

    Check for Squareness of Roof Trusses: As you place the roof trusses, measure the diagonal distance between the two trusses. Make sure the trusses are level and square to maintain proper alignment.

    When to Call a Professional

    While squaring your pole barn is often a straightforward task, there are certain situations where it’s best to call in a professional. 

    If you’re dealing with a large, complex structure or if you lack the necessary tools and experience, hiring a contractor can save you time and effort. 

    A professional can ensure that everything is properly aligned and squared, giving you peace of mind knowing the job was done correctly.

    Preventing Future Squaring Issues

    To avoid squaring issues down the line, make sure to:

    Inspect Your Barn Regularly: Check the squareness and stability of your barn periodically to catch any potential issues before they become major problems.

    Use Quality Materials: Invest in high-quality materials for the frame and foundation to ensure long-lasting stability.

    Perform Routine Maintenance: Routine maintenance and inspections will help keep your pole barn secure and prevent misalignment caused by weather, wear, or other factors.

    Frequently Asked Questions 

    1. How do I know if my pole barn is square?

    Use the 3-4-5 method, check with a framing square, and use a string line to ensure the structure is properly aligned and squared.

    2. Can I fix a misaligned pole barn myself?

    If the misalignment is minor, you can adjust the posts and framing yourself. However, for major issues, it’s best to call in a professional.

    3. How do I prevent my pole barn from shifting or becoming misaligned?

    Ensure the foundation is level, use high-quality materials, and conduct regular inspections to prevent misalignment over time.

    Conclusion

    Squaring a pole barn is a crucial step in ensuring the structure is stable, functional, and aesthetically pleasing. 

    By following the steps outlined in this guide, you can achieve a properly squared and aligned pole barn, whether you’re building it yourself or overseeing the construction. 

    Regular maintenance and periodic checks will help keep your pole barn in excellent condition for years to come. 

    If you’re unsure about any part of the process, don’t hesitate to contact a professional to ensure the job is done correctly.

  • How to Build a Pole Barn Garage – Don’t Miss This Pro Guide

    How to Build a Pole Barn Garage – Don’t Miss This Pro Guide

    Building a pole barn garage is a great option for homeowners seeking a durable, cost-effective, and versatile structure for their vehicles or extra storage. 

    Unlike traditional garages, pole barns use posts as the main support, making them quicker and often cheaper to build. 

    In this guide, we’ll walk you through the essential steps to build your own pole barn garage, from planning to construction and finishing.

    How to build a pole barn garage?

    To build a pole barn garage, start with planning the foundation, then place vertical posts, and frame the structure. Don’t forget to add proper insulation, doors, and windows for functionality.

    Key Takeaways

    • Pole barns offer a cost-effective and durable solution for building a garage.
    • The process includes site preparation, planning, framing, and finishing touches.
    • Proper materials, tools, and safety precautions are essential for a successful project.

    Step 1: Planning and Preparation

    Pole Barn Manufacturer Construction

    Before you begin the construction of your pole barn garage, proper planning and preparation are crucial. 

    Building a pole barn garage can be a great option for homeowners looking for a durable, cost-effective, and versatile structure for their vehicles or extra storage. 

    Unlike traditional garages, pole barns rely on posts or poles for support, which makes them faster and often more affordable to build. If you want to explore this option further, you can get details on pole barn builds to see why they’re such a practical choice. 

    We will walk you through the essential steps to build your own pole barn garage, from planning and preparation to construction and finishing.

    This step involves selecting the site, determining the size of the structure, and ensuring that you comply with local building codes and regulations.

    Choosing the Right Location

    The first step is selecting a suitable location for your pole barn garage. 

    Choose an area that is level and accessible, ensuring that it won’t interfere with any existing structures or utilities. 

    Consider factors such as sunlight exposure, wind direction, and the proximity to roads.

    Obtaining Permits

    In many locations, you will need to obtain a building permit before starting construction. 

    Local zoning laws and building codes may require you to submit plans and get approval before you can proceed. 

    Be sure to check with your local building department to ensure you are following all necessary regulations.

    Planning the Design

    Next, you’ll need to decide on the design and size of your pole barn garage. 

    Consider the number of vehicles you want to store, any additional space for tools or equipment, and whether you plan to add windows or a loft for additional storage—especially if you’re thinking about DIY loft construction in a pole barn to maximize vertical space efficiently.

    If you’re thinking about adding natural light or ventilation, it’s also worth learning how to install a window in a metal pole barn to ensure proper placement and structure.

    Most pole barns are customizable, so take time to plan the design that fits your needs.

    Step 2: Preparing the Site

    Once your plans are ready, it’s time to prepare the site. Proper site preparation ensures the foundation of the pole barn is level and secure. 

    This step may involve clearing the area, digging post holes, and leveling the ground.

    Clearing the Area

    Before building your 24×24 pole barn garage, begin by clearing the area of any debris, trees, or rocks that could obstruct construction. Depending on the size of the obstacles, you might need tools like a shovel or even a backhoe to properly prepare the land.

    Marking the Posts

    Using stakes and string, mark the exact location of the poles that will serve as the foundation of your barn. 

    Measure the distances carefully to ensure the poles are placed correctly according to your plans.

    Digging Post Holes

    Using a post hole digger or auger, dig holes for the support posts. The holes should be deep enough to anchor the poles securely. 

    Generally, post holes should be at least 3 to 4 feet deep, depending on the size of the poles and the frost line in your area. This range is often considered the ideal depth for pole barn posts, ensuring stability and longevity. Ensure the holes are spaced evenly according to your design.

    Step 3: Building the Frame

    pole balm 2

    With the site prepared, it’s time to start building the frame of your pole barn garage. 

    The frame is the skeleton of the barn and includes the support posts, beams, and trusses that will hold the structure together.

    Installing the Support Posts

    Place the support posts into the holes you dug earlier. Make sure the posts are straight and level before filling the holes with concrete to anchor them. 

    Use a level to check the vertical alignment of the posts, since even slight shifts can impact the stability and the overall size of your pole barn. Make sure the concrete is fully set before moving on to the next step.

    Adding Beams and Headers

    Next, you’ll install horizontal beams and headers across the top of the posts to provide structural support for the roof and walls. 

    Secure the beams to the posts using metal brackets, bolts, or screws. This will create a sturdy frame for the rest of the barn.

    Installing the Trusses

    The trusses are the components that support the roof of the pole barn. Once the frame is complete, lift the trusses onto the beams and secure them with bolts or nails. 

    Depending on the size of your barn, you may need assistance with lifting and positioning the trusses—especially if you’re planning to install a 40×80 pole barn, which requires precise handling and support.

    Step 4: Installing the Roof

    Now that the frame is in place, it’s time to install the roof. This step involves adding roofing materials and ensuring the structure is waterproof and weather-resistant.

    Choosing Roofing Materials

    There are a variety of roofing materials available, such as metal panels, shingles, and corrugated plastic. If you’re planning a durable structure, it’s a good idea to find out about steel pole barn solutions that often pair well with these roofing options. 

    Metal roofing is often the preferred choice for pole barns due to its durability and resistance to harsh weather conditions. 

    Make sure to select materials that are suitable for your climate and budget.

    Installing the Roof Panels

    Once the roofing material is chosen, start at one end of the barn and install the panels, securing them to the trusses with screws or nails. 

    Be sure to overlap the edges of the panels to prevent water from seeping through. Install ridge caps along the top of the roof to cover the seams and provide additional protection against leaks.

    Step 5: Building the Walls

    With the roof in place, it’s time to build the walls of your pole barn garage. This involves adding wall panels, windows, doors, and any other features you’ve planned for.

    Installing Wall Panels

    Depending on your design, you can install wood, metal, or vinyl wall panels. Start at the bottom and work your way up, securing the panels to the frame with screws or nails. 

    Leave space for windows and doors where needed, and ensure the panels are level as you go.

    Adding Doors and Windows

    After the panels are installed, it’s time to add the doors and windows. Garage doors typically require a wider frame, so make sure you measure carefully before installation. 

    Windows can be added for natural light or ventilation, depending on your needs.

    Step 6: Finishing Touches

    After completing the frame, roof, and walls of your pole barn garage, it’s time to focus on the finishing touches that will complete the structure and enhance its functionality. 

    This phase includes adding interior features, insulation, paint, and trim, all of which will contribute to the aesthetics and long-term durability of your garage.

    Insulating the Garage

    Insulation is a crucial step in ensuring that your pole barn garage is usable year-round. 

    Whether you plan to use your garage as a living space, workshop, or storage area, insulation helps regulate the internal temperature and makes the space more comfortable. 

    Insulating the garage can keep it warm in the winter and cool in the summer, ensuring that the space remains functional no matter the weather conditions outside.

    There are several options for insulation. The most common method is to install batt insulation between the framing of the walls and roof. 

    This type of insulation is easy to install and relatively cost-effective. If you want to improve energy efficiency further, spray foam insulation is an excellent option. 

    Spray foam provides a more airtight seal, preventing heat transfer and moisture from entering. 

    Foam board insulation is another viable option for providing a solid layer of thermal protection to the walls and ceiling. When insulating your pole barn ceiling, foam board offers a lightweight yet effective solution that helps maintain consistent temperatures and improve energy efficiency.

    Regardless of the type you choose, make sure to insulate both the walls and the roof to ensure consistent temperatures throughout the garage.

    Painting and Sealing

    Once the insulation is in place, the next step is to protect the barn from the elements by applying paint or a sealant to the exterior. 

    Pole barns are often exposed to harsh weather conditions, including rain, snow, and extreme sunlight, so protecting the materials from rust, mildew, and water damage is essential. 

    A fresh coat of paint not only enhances the appearance of your pole barn garage but also adds a protective layer that helps your pole barn to last much longer by shielding it from moisture, UV rays, and general wear and tear.

    Choose paint that is specifically designed for outdoor use, as these products are more durable and resistant to the elements. 

    Look for paint that can withstand UV rays from the sun and the moisture from rain or snow. 

    Additionally, consider applying a high-quality sealant to areas that are particularly prone to water exposure, such as the roof and foundation. 

    This will further protect the barn from moisture damage and help prevent issues like rust and mold growth.

    Final Touches

    Finally, add the finishing touches like trim, interior features, and any custom elements you desire. 

    Whether it’s installing shelves, cabinets, or a workbench in the garage, these additions will improve functionality and give your pole barn garage a polished, professional appearance. 

    By focusing on these final details, you can ensure that your pole barn garage is both practical and visually appealing.

    Step 7: Maintenance and Upkeep

    new pole balm

    Once your pole barn garage is complete, it’s important to keep up with regular maintenance to ensure that the structure lasts for many years. 

    Proper upkeep not only helps maintain the functionality of the garage but also prevents expensive repairs down the road. 

    Here’s what you should consider when maintaining your pole barn garage:

    Inspect the Structure Periodically

    Routine inspections are essential to catch any potential issues before they become major problems. 

    Inspect the structure at least once or twice a year, paying close attention to the foundation, roof, and walls. 

    Check for any signs of damage, such as cracks, leaks, or rust spots. If you notice any issues, address them promptly to prevent further deterioration.

    In addition to the exterior, don’t forget to check the interior as well. Ensure that the insulation remains intact and undamaged. 

    If you used spray foam or foam board insulation, inspect the interior for any signs of moisture accumulation or mold, which could reduce the effectiveness of the insulation and compromise the energy efficiency of the garage.

    Cleaning the Gutters

    Keeping the gutters clean is an important part of maintaining your pole barn garage. 

    Clogged gutters can cause water to accumulate and flow down the sides of the building, leading to potential damage. 

    Over time, this water buildup can lead to rot, rust, or foundation issues. 

    Make sure to clean the gutters at least twice a year—once in the spring and once in the fall—removing leaves, dirt, and debris that may block water flow.

    If you live in an area with heavy rainfall or snowfall, it’s important to check the gutters more frequently to ensure that they are functioning properly—especially if your structure is a residential pole barn. While living in a pole barn is legally possible, it’s essential to ensure the building meets local residential codes and includes proper drainage systems to handle severe weather.

    Consider installing gutter guards to minimize debris buildup and reduce the frequency of gutter cleaning.

    Checking the Roof

    The roof of your pole barn garage is one of the most critical components when it comes to maintenance. 

    Make sure to inspect the roof for signs of damage, such as missing shingles, loose panels, or cracks. 

    If you have a metal roof, check for rust or dents that may have occurred from storms or other environmental factors. 

    If you spot any issues, repair them immediately to prevent water damage.

    Regularly cleaning the roof is also important, as leaves and debris can accumulate and create areas where water can pool. This pooling can lead to leaks and damage over time. 

    Use a broom or a leaf blower to keep the roof clear of debris, and be sure to check the roof after major storms to ensure no damage has occurred.

    Frequently Asked Questions 

    1. How long does it take to build a pole barn garage?

    The time it takes to build a pole barn garage can vary depending on the size of the structure and whether you’re doing it yourself or hiring professionals. On average, a pole barn garage can be completed in 1 to 3 weeks.

    2. How much does it cost to build a pole barn garage?

    The cost of building a pole barn garage depends on factors such as the size of the structure, materials used, and whether you hire professionals. On average, the cost can range from $5,000 to $15,000 or more.

    3. Can I build a pole barn garage myself?

    Yes, you can build a pole barn garage yourself if you have the right tools, materials, and experience. However, it’s recommended to consult with a professional if you’re unsure about any part of the process.

    Conclusion

    Building a pole barn garage can be an excellent solution for homeowners who need additional storage or want a durable and cost-effective garage. 

    While the process requires careful planning, preparation, and execution, the results are well worth the effort. 

    Whether you decide to tackle the project yourself or hire a professional, a pole barn garage offers a long-lasting and versatile space for your vehicles and belongings.


  • What Is a Pole Barn House – The Answer Might Surprise You

    What Is a Pole Barn House – The Answer Might Surprise You

    A pole barn house is becoming an increasingly popular choice for homeowners seeking an affordable, durable, and versatile living space. 

    Traditionally used for agricultural buildings, pole barns have evolved into modern homes with many benefits. 

    In this article, we’ll explore what a pole barn house is, how it differs from other homes, and the advantages of choosing this construction for your next home.

    What is a pole barn house?

    A pole barn house combines the pole barn’s post-frame construction with residential living space. It offers a spacious, cost-effective, and customizable home design, especially in rural areas.

    Key Takeaways

    • A pole barn house is a structure that uses large poles or posts as the primary support for the building.
    • Pole barn houses offer a cost-effective and customizable alternative to traditional homes.
    • They provide excellent durability, energy efficiency, and flexibility in design.

    What is a Pole Barn House?

    pole balm 1

    A pole barn house is a type of construction where the primary structural support comes from large posts or poles, which are placed deep into the ground or secured to a concrete foundation. 

    These posts act as the main framework, supporting the roof and walls of the building. 

    The space between the posts is typically filled with steel, wood, or other materials to form the walls and roofing.

    Unlike traditional home construction, which typically relies on a frame of wood studs, a pole barn house uses fewer materials for the same structural strength. 

    The result is a building that is less expensive to construct and easier to maintain, making it a popular choice for homeowners on a budget.

    How Does a Pole Barn House Differ from Traditional Homes?

    While a pole barn house shares some similarities with traditional homes, there are key differences in construction, cost, and design flexibility.

    Construction and Structure

    Traditional homes typically use a framing method where wood studs, beams, and joists are used to support the roof, walls, and floors. 

    The framing is anchored to a solid foundation, often concrete, which ensures long-term stability. If you’re wondering is a pole barn or metal building better, the foundation design plays a big role in the answer.

    In contrast, a pole barn house uses large posts buried in the ground or set in concrete as the primary support. 

    These posts are spaced out to form the skeleton of the building, and the walls and roof are attached to the posts. 

    The lack of a traditional frame means that a pole barn house is often more spacious and less restrictive in terms of layout.

    Cost

    One of the main benefits of a pole barn house is its cost. Traditional home construction requires more materials and labor to build the framework, which drives up the price. 

    On the other hand, pole barn houses are typically cheaper to construct due to their simpler design and fewer materials. 

    Homeowners can save money on both the construction process and ongoing maintenance costs.

    Energy Efficiency

    Pole barn houses are often more energy-efficient than traditional homes. 

    The design allows for more insulation to be added to the walls and roof, which helps keep the temperature stable inside. 

    Additionally, the construction method allows for large, open spaces, which means fewer walls and corners where heat can escape.

    Benefits of Building a Pole Barn House

    There are many reasons why a pole barn house might be the right choice for you. Below are some of the most significant benefits.

    Affordability

    As mentioned, pole barn houses are more cost-effective to build than traditional homes. 

    With fewer materials required and a simpler construction process, homeowners can save thousands of dollars on the initial build. 

    Additionally, pole barn houses tend to have lower ongoing maintenance costs due to the durability of the materials used.

    Durability and Longevity

    Small Pole barn houses are known for their strength and durability. 

    The posts that support the structure are usually crafted from treated wood, steel, or other weather-resistant materials, allowing them to withstand tough conditions like wind, snow, and heavy rain. Learn more about 24×36 pole barn designs to see how these durable materials are used in real-world builds.

    The overall structure is designed to last for many years with minimal maintenance.

    Customization

    One of the most appealing features of pole barn houses is the level of customization they offer. 

    Since the design is more flexible than traditional home construction, homeowners can create a unique layout that fits their specific needs. 

    Whether you want a large open-plan living space or multiple levels with a loft, a pole barn house can be adapted to suit any design preference. If you’re wondering how to build a loft in a pole barn, there are plenty of customizable options to help you create the perfect upper-level retreat.

    Energy Efficiency

    Thanks to the open-space design, pole barn homes tend to be more energy-efficient. They allow for better insulation throughout the building, keeping the temperature consistent year-round.

    If you’re wondering what is better—a pole barn or metal building—consider that this energy efficiency is one of the key advantages pole barns have to offer.

    This can help reduce energy bills, especially if the house is built with energy-efficient windows, insulation, and roofing materials.

    Environmentally Friendly

    Building a pole barn house can be an eco-friendly choice as well. The materials used in construction are often locally sourced, which reduces transportation emissions. 

    Additionally, many pole barn homes are built using sustainable practices, such as recycling materials and incorporating energy-efficient features.

    Things to Consider Before Building a Pole Barn House

    FinishRoof Inside

    While there are many advantages to building a pole barn house, there are also some factors to consider before you make the decision.

    Zoning and Permitting

    Before starting construction on a pole barn house, you will need to check with local zoning authorities to ensure that the building complies with local regulations. 

    Some areas may have restrictions on pole barn homes, especially if you are planning to build in a residential area.

    Foundation Requirements

    Although pole barn houses require fewer materials than traditional homes, the foundation still needs to be properly designed to support the structure. 

    This may require consulting with an engineer or contractor to ensure that the foundation is adequate for your specific needs.

    Design Restrictions

    While pole barn houses are highly customizable, the design may be limited by the space available, local zoning regulations, and budget constraints. 

    If you are looking for a more traditional or elaborate architectural style, you may need to work within the confines of the pole barn design.

    Steps to Building a Pole Barn House

    If you’ve decided that a pole barn house is right for you, the next step is to plan the construction. Here’s a general overview of the process:

    Planning and Design

    Start by designing your pole barn house. If you’re aiming for a medium-sized structure, a 30×40 metal pole barn kit can be a great starting point. You’ll need to decide on the size, layout, and materials.

    It’s also important to consider the local climate and environment when selecting insulation, roofing, and siding materials—especially if you’re learning how to install metal siding on a pole barn, as material choice can significantly impact long-term performance.

    Obtaining Permits

    Before you begin construction, make sure to obtain the necessary permits from your local zoning and building authorities. This will ensure that your pole barn house is in compliance with local regulations.

    Understanding what happens if you build a pole barn without a permit is crucial—failure to secure the proper permits can lead to fines, costly retroactive inspections, forced modifications, or even complete removal of the structure.

    Building the Foundation

    The foundation for a pole barn house typically consists of concrete pads or a continuous concrete slab. The posts are then anchored to the foundation and spaced accordingly.

    Assembling the Frame

    Once the foundation is in place, the frame is constructed using treated posts, steel, or wood. The frame serves as the skeleton of the house, supporting the roof and walls.

    Adding the Roof and Walls

    Once the frame is completed, the next step is to add the roof and walls. You can choose from a variety of materials, such as steel, wood, or vinyl, depending on your preferences and budget.

    Installing Utilities

    Next, you’ll need to install utilities like plumbing, electrical wiring, and HVAC systems. This step may require professional help to ensure that everything is installed safely and up to code.

    Finishing Touches

    Finally, add insulation, flooring, and any other finishing touches, such as windows, doors, and interior walls. The final steps will give your pole barn house a more traditional home feel.

    Frequently Asked Questions 

    1. Is a pole barn house cheaper to build than a traditional home?

    Yes, pole barn houses are typically cheaper to build than traditional homes. The construction process is simpler, and fewer materials are required. If you’re looking to save on costs and streamline your project, learning how to build a metal pole barn can be a practical and efficient option.

    2. How long does it take to build a pole barn house?

    The timeline for building a pole barn house can vary depending on the size and complexity of the project. For example, a 36×48 pole barn or 40×40 pole barn house, which offers a spacious yet manageable layout, might take anywhere from a few months to a year to complete, depending on design choices and construction conditions.

    3. Can I get financing for a pole barn house?

    Yes, it’s possible to secure financing for a pole barn house. However, it may be more challenging than for a traditional home, as some lenders may view it as unconventional. It’s best to speak with a lender to explore your options.

    Conclusion

    A pole barn house can be an excellent choice for homeowners seeking an affordable, customizable, and durable living space. 

    With the right planning and construction, a pole barn house offers many benefits, including cost savings, energy efficiency, and flexibility in design. 

    While there are some factors to consider, such as zoning regulations and foundation requirements, the advantages often outweigh the challenges. 

    Whether you’re building a home in the countryside, on a small plot of land, or in a more rural area, a pole barn house can be a great solution that suits your lifestyle and budget.

  • Why Is It Called a Pole Barn – This Might Surprise You

    Why Is It Called a Pole Barn – This Might Surprise You

    When you hear the term “pole barn,” you might wonder what makes it different from other types of structures. 

    Pole barns have become popular for a range of uses, from agricultural buildings to storage units and homes. 

    In this article, we’ll explore the origin of the name, the construction process, and why pole barns are such a practical and versatile option for many.

    Why is it called a pole barn?

    It’s called a pole barn because it uses vertical posts (poles) to support the structure, making it simpler and cheaper to build than traditional framed buildings. It’s all about that post-frame design!

    Key Takeaways

    • The name “pole barn” comes from the use of large poles as the primary support structure.
    • Pole barns are cost-effective, quick to build, and highly adaptable for various uses.
    • Understanding the construction and history of pole barns can help you determine if one is the right choice for your needs.

    The Origins of the Term “Pole Barn”

    gray metal pole barn with one white

    The term “pole barn” is closely tied to the method of construction used in these buildings. 

    posts) are used to support the structure rather than traditional foundation walls or frames made from wooden studs or metal beams. If you’re wondering how to frame a pole barn, it begins with setting these posts securely in the ground or on concrete footings, followed by attaching horizontal girts and roof trusses to form the skeleton of the building.

    The origin of the name comes from the primary structural elements used in the construction: the poles. These poles are typically made from treated wood, steel, or other durable materials. 

    They are placed deep into the ground to provide a stable foundation and support the roof and walls of the barn.

    In the early days, pole barns were used primarily for agricultural purposes, such as housing livestock, storing hay, or protecting farm equipment. 

    Over time, the pole barn design proved to be versatile enough for many other uses—making it a popular choice for those learning how to design a pole barn for workshops, garages, and even homes.

    How Does a Pole Barn Differ from Other Types of Barns?

    A key feature that distinguishes a pole barn from other types of barns is its unique construction technique. 

    Unlike traditional barns that rely on load-bearing walls, pole barns use vertical posts placed into the ground or set into concrete footings to support the structure. 

    The posts are spaced at regular intervals, with horizontal beams, trusses, and siding added to create the walls and roof—an essential step when learning how to close in a pole barn with metal trusses.

    Advantages of Pole Barn Construction

    Cost-Effective: One of the main reasons why pole barns became popular, especially in agricultural settings, is that they are typically less expensive to build than traditional wooden or steel-framed buildings.

    If you’re considering building one, you might be asking, How much does a pole barn cost? The price can vary widely depending on size, materials, and customization, but on average, you can expect costs to range from $15,000 to $50,000 or more.

    This is because the construction requires fewer materials and is less labour-intensive.

    Faster Construction: Due to their simpler design, pole barns can be constructed quickly. 

    The use of poles instead of foundation walls allows for faster assembly, reducing both labour and construction time.

    Durability: Despite their simple design, pole barns are incredibly durable. 

    Built with preservative-treated posts to resist rot, these structures are designed to endure even the harshest weather—making them a reliable choice for rural properties. Explore our 24×24 pole barn builds to see how durability meets functionality in challenging environments.

    Versatility: Pole barns can be used for a wide variety of purposes. Whether for farming, storage, or as a residential or commercial building, pole barns can be adapted to suit many needs. 

    They are often used for garages, workshops, warehouses, barns, and even homes.

    The Construction Process of a Pole Barn

    best rated pole barn builders georgia

    Now that we understand why pole barns are named as they are, let’s take a look at the construction process and how these buildings are built.

    Step 1: Site Preparation

    The first step in building a pole barn is preparing the site. This involves clearing the land, removing any debris or obstacles, and leveling the ground. 

    Depending on the size of the building, you may need to excavate part of the site to accommodate the depth of the poles.

    Step 2: Setting the Posts

    The most critical part of pole barn construction is setting the posts. 

    Large poles, typically made from treated wood or steel, are placed vertically into the ground or mounted on concrete footings. 

    These posts are spaced evenly, depending on the design and intended use of the structure.

    In some cases, the posts are set into the ground with the help of heavy machinery or dug by hand, depending on the size of the building and the type of soil. For example, constructing a 30×40 pole barn with loft may require deeper post settings and more precise placement to ensure structural stability and accommodate the added height and weight of the loft area.

    The posts are then secured and reinforced to ensure stability.

    Step 3: Installing the Trusses and Roof

    Once the posts are securely in place, horizontal beams are attached to the posts to form the framework. 

    Trusses are then installed on top of the beams to support the roof. The roof can be made from various materials, including metal, shingles, or other durable materials.

    Step 4: Adding Siding and Doors

    With the roof structure in place, siding is added to the walls to enclose the barn. This step often includes installing metal panels on a pole barn, especially when durability and low maintenance are priorities. The siding can be made from wood, metal, or other materials.

    Doors and windows are also installed at this stage, allowing access to the interior and providing natural light — it’s considered the best way to install windows in a pole barn for both functionality and efficiency.

    Frequently Asked Questions 

    1. Are pole barns as durable as traditional buildings?

    Yes, pole barns can be just as durable as traditional buildings. The treated posts used in the construction are designed to withstand the elements and provide long-lasting support.

    2. How long does it take to build a pole barn?

    The construction of a pole barn typically takes between a few days and a few weeks, depending on the size and complexity of the project. The process is faster than traditional construction methods.

    3. Can I customise my pole barn design?

    Yes, pole barns are highly customisable. You can choose the materials, size, and layout to suit your needs, whether for agricultural, residential, or commercial purposes.

    Conclusion

    A pole barn is a practical, affordable, and versatile structure that offers numerous benefits for a wide range of uses. 

    Its name comes from the main construction method, where large poles serve as the primary support structure. You can discover more about pole barns and metal buildings to see how this design compares to modern steel alternatives.

    Pole barns are ideal for anyone looking for a cost-effective, durable, and flexible solution for storage, workshops, or even residential living. 

    Whether you’re a farmer, a homeowner, or a business owner, a pole barn can provide the space and functionality you need at a fraction of the cost of traditional buildings.