Upgrading your pole barn? Metal siding is tough, stylish, and built to last. Whether it’s a new build or an update, proper installation is key to a polished look and lasting performance.
This guide takes you step-by-step through the metal siding process—so your barn is ready to handle whatever comes its way.
How to Install Metal Siding on Pole Barn?
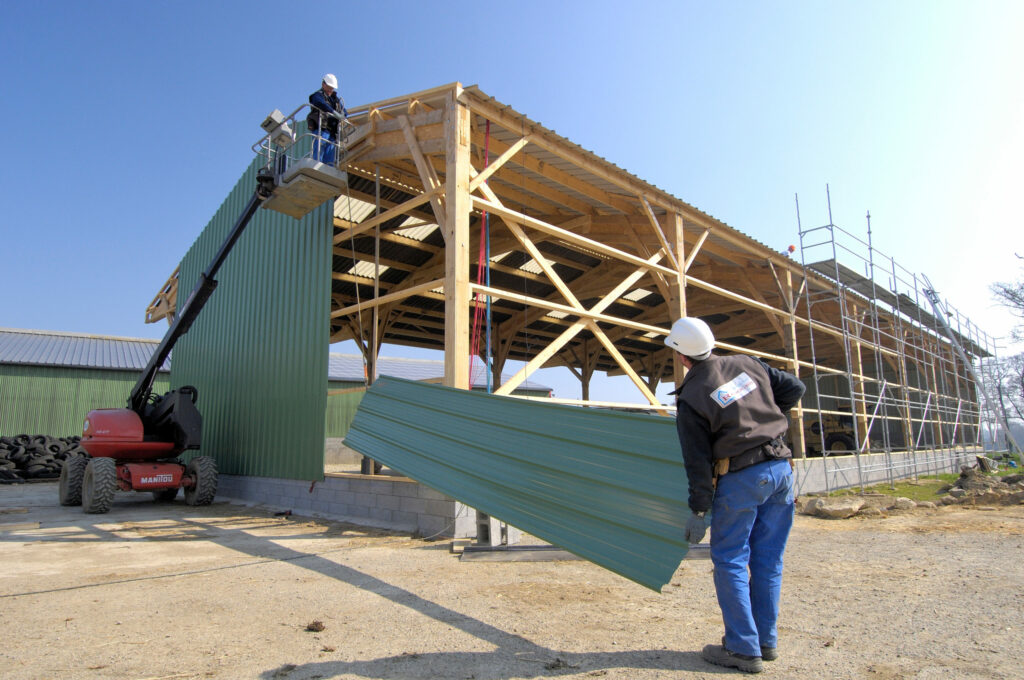
To install metal siding on a pole barn, start by securing the first panel at the bottom, then work upwards, overlapping each panel. Use screws or fasteners designed for metal to ensure a tight fit.
Key Takeaways
- Proper preparation and measuring are essential for successful metal siding installation.
- Using high-quality materials and following the right techniques ensures a long-lasting and professional finish.
- Take time to secure the metal panels properly to prevent future issues like leaks or misalignment.
What You’ll Need for Metal Siding Installation

Before starting the installation process, gather all the necessary materials and tools. Here’s a list of what you will need:
Materials:
- Metal siding panels (ensure you have enough for the entire barn)
- Screws (preferably rust-resistant)
- Flashing
- Sealant (to prevent leaks)
- J-channel (for corners and edges)
Tools:
- Tape measure
- Drill and screwdriver bits
- Saw (if you need to cut the panels to size)
- Ladder or scaffolding
- Level
- Safety gear (gloves, eye protection, etc.)
Step 1: Prepare the Surface of the Pole Barn
The first step in installing metal siding is to prepare the surface of your pole barn. This will ensure that the siding attaches properly and that the finished product looks professional.
Check for Cleanliness: Before starting, make sure the pole barn walls are clear of dirt, dust, or debris. Cleaning the surface creates a solid base for siding and ensures better results when learning how to install metal roofing on pole barn projects.
Inspect the Structure: Before installing any siding, check the pole barn’s frame and make sure everything is square and level. If there are any issues, address them before proceeding.
Step 2: Measure and Plan the Installation
Accurate measurements are crucial when installing metal siding to ensure everything fits correctly. Measure the height and length of the wall sections, including any windows or doors.
Measure the Length and Height: Start at one end of the barn and measure the full length of the walls. If you’re planning around windows or doors, be sure to factor those into your numbers—especially when comparing different metal pole barn siding options that need precise measurements.
Plan the Siding Panels: Decide how you will arrange the panels. Typically, it’s best to install metal panels horizontally, starting at the bottom and working upwards. This ensures proper water runoff and prevents moisture from getting under the siding.
Step 3: Install the First Metal Panel
Once the measurements are complete, it’s time to start installing the first metal panel. This is a crucial step because it will set the foundation for the rest of the installation process.
Position the First Panel: Start at one end of the barn and position the first metal panel in place. Use a level to ensure it is perfectly straight. This will ensure that the rest of the panels align correctly.
Secure the Panel: Drill pilot holes and then secure the panel to the framing using screws. The screws should go into the framing behind the siding to ensure a strong hold.
Leave a small gap between the panel and the barn structure for expansion due to temperature changes.
Step 4: Install Additional Panels
Once the first panel is installed, you can begin adding the rest of the panels. Metal siding panels usually come with interlocking edges to make installation easier.
Overlap the Panels: Each subsequent panel should overlap the previous one by about one inch. This helps ensure water flows away from the barn and prevents leaks.
Secure the Panels: Continue securing each panel to the barn using screws, making sure they are all level and aligned. Use the drill and screwdriver to tighten the screws firmly but avoid over-tightening, which could damage the panels.
Trim if Necessary: If the panels are too long for the barn, use a saw to trim them to the correct length. Always measure and double-check before cutting to avoid mistakes.
Step 5: Install the J-Channel and Flashing
J-channel is used to finish the edges of the metal siding and create a clean, professional look.
Flashing is also important for preventing water from getting under the siding and causing damage.
Install J-Channel: Attach the J-channel to the edges of the barn where the siding meets the corners, windows, and doors. The J-channel helps hold the siding in place and gives it a finished appearance.
Apply Flashing: Flashing should be installed around any openings, such as doors and windows, to prevent water infiltration. It directs water away from these areas and ensures that your siding stays protected.
Maintenance Tips for Metal Siding

To ensure your metal siding remains in good condition over time, here are a few maintenance tips:
Clean Regularly: Use a mild detergent and water to clean your metal siding every few months. This will help remove dirt, grime, and other debris that could affect the finish.
Check for Damage: Inspect your metal siding annually for any signs of damage, such as dents or rust. If you notice any issues, address them immediately to prevent further damage.
Reapply Sealant: Over time, the sealant may wear down. Reapply sealant around the edges and joints every few years to maintain a strong, waterproof seal.
Frequently Asked Questions
1. How long does it take to install metal siding on a pole barn?
The installation process typically takes 1-3 days, depending on the size of the barn, the number of panels, and the complexity of the job. Proper preparation and having a helper can speed up the process.
2. Can I install metal siding on an existing pole barn?
Yes, you can install metal siding on an existing pole barn. You may need to remove old siding and prepare the surface before applying the new metal panels.
3. What is the best material for metal siding on a pole barn?
Steel is the most popular choice for metal siding on pole barns due to its durability, affordability, and resistance to weather. You can also opt for aluminium or corrugated metal depending on your budget and needs.
Conclusion
Installing metal siding on a pole barn is a great way to enhance the appearance, durability, and energy efficiency of your building.
While the process requires some preparation and effort, it’s a manageable DIY project for most homeowners.
By following the steps outlined in this guide, you can install metal siding successfully and enjoy the benefits for years to come.
Whether you’re upgrading your current barn or building a new one, metal siding is a reliable and cost-effective solution.
Find Out More About Board and Batten Metal Siding and Metal Roofing Tools and Accessories

